If you’ve ever found yourself staring at a red or silver liquid column inside a glass thermometer, second-guessing whether you’re reading it right, you’re not alone. As a supplier of high-precision glass thermometers—used in everything from clinical settings and food service to industrial labs and home brewing—I’ve spent thousands of hours walking customers through this exact process. What surprises most people is how simple and consistent it is, once you know the small, non-negotiable rules that come with these older, reliable tools. Digital thermometers are everywhere now, but glass ones still hold a spot for their durability, lack of battery dependency, and long-term accuracy—if you read them correctly. Let’s break this down step by step, and clear up the most common mistakes I see new users make. Thermometers

First, a quick reality check: not all glass thermometers are the same. This isn’t a “one-size-fits-all” situation. When I ship an order out, I always include a small cheat sheet with the product code, because the way you read a clinical oral thermometer is different from a meat thermometer, a lab-grade precision thermometer, or a weather thermometer for outdoor use. The liquid inside is usually either alcohol (colored red for visibility, common for home and casual use) or mercury (silver, for high-precision applications where alcohol might not expand evenly at extreme temperatures). Mercury has been phased out in many consumer products for safety reasons, but it’s still the gold standard for professional grade work, and every reading rule applies the same to both types. The biggest thing to check first is the temperature range marked on the side of your thermometer. A clinical oral thermometer, for example, will be marked from about 35°C to 42°C (95°F to 108°F)—if you’re holding that one up to a room temperature of 22°C and trying to read a column that’s sitting at the bottom end, you’ll get a number that’s way too low, just because it’s designed for body temperature. A lab thermometer might go from -20°C to 150°C, so you can’t use it to take a baby’s temperature. Matching the thermometer to the job is step zero, and I can’t tell you how many people contact our support team saying “my thermometer is broken” when they just grabbed the wrong tool for the task.
Next, the pre-reading prep, which is just as important as reading itself. Glass thermometers work on thermal expansion: the liquid inside gets warmer, expands, and climbs the narrow tube inside the glass stem. If the thermometer is at a different temperature than the environment you’re reading it in, the liquid will still be expanding or contracting, which gives you an incorrect number. That’s why the biggest mistake I see is grabbing a thermometer right after it’s been taken out of a mouth, oven, or fridge and trying to read it immediately. You have to give it 2 to 3 minutes to acclimate to the temperature of the space where you’re taking the reading. For clinical thermometers, that means leaving it on a counter at room temperature before you handle it. For meat thermometers, after you pull it out of a roast, you let it sit for that same 2 to 3 minutes, not just 10 seconds before jabbing it again. Another prep step: holding the thermometer correctly. This sounds silly, but it’s critical. You want to grip the very end of the glass stem, opposite the bulb (the round, hollow part at the bottom that holds the liquid reservoir). If you hold the bulb end, your own body heat will warm the liquid inside, making it rise higher than the actual temperature it’s measuring. I’ve had a baker tell me their meat thermometer was reading 10 degrees too high, and it turned out they were holding the bulb while reading it—simple fix, once we pointed that out. Also, avoid touching the back of the thermometer with your fingers, because that same body heat messes with the liquid.
Now, the actual reading part, and this is where 90% of new users get confused. First, you need to hold the thermometer at eye level. If you hold it at an angle—looking down at it, or up at it—the liquid column will appear higher or lower than it actually is, because of the way the curved glass stem bends light. This is called parallax error, and it’s one of the most avoidable mistakes. To fix this, bring the thermometer up to your face, so your eyes are perfectly level with the liquid column. For most glass thermometers, the stem is thin, and the markings are etched on the glass, so this is easy to do. Next, find the meniscus. That’s the curved top of the liquid column, right? Not the rounded part at the very top edge, not the bottom. The meniscus is that little curve where the liquid meets the inner wall of the stem. Now, here’s the key rule: for alcohol (red) thermometers, you read the bottom of the meniscus. For mercury (silver) thermometers, you also read the bottom of the meniscus—wait, I thought some people read the top? No, that’s a myth. I’ve tested this hundreds of times in our calibration lab, and the line of accuracy is the same for both, because the scale is calibrated to match that bottom point. Let me confirm that with a quick example: if the red alcohol curves upward at the edges, dipping down in the middle, that dip is the meniscus, and you align that dip with the numbered line on the stem. That’s your temperature. I once worked with a bartender who swore his thermometer was broken because he was reading the top curve of the red liquid, and he was off by 3 degrees on his syrup for craft cocktails. That ruined a whole batch, and he switched to reading the bottom, and never had a problem again.
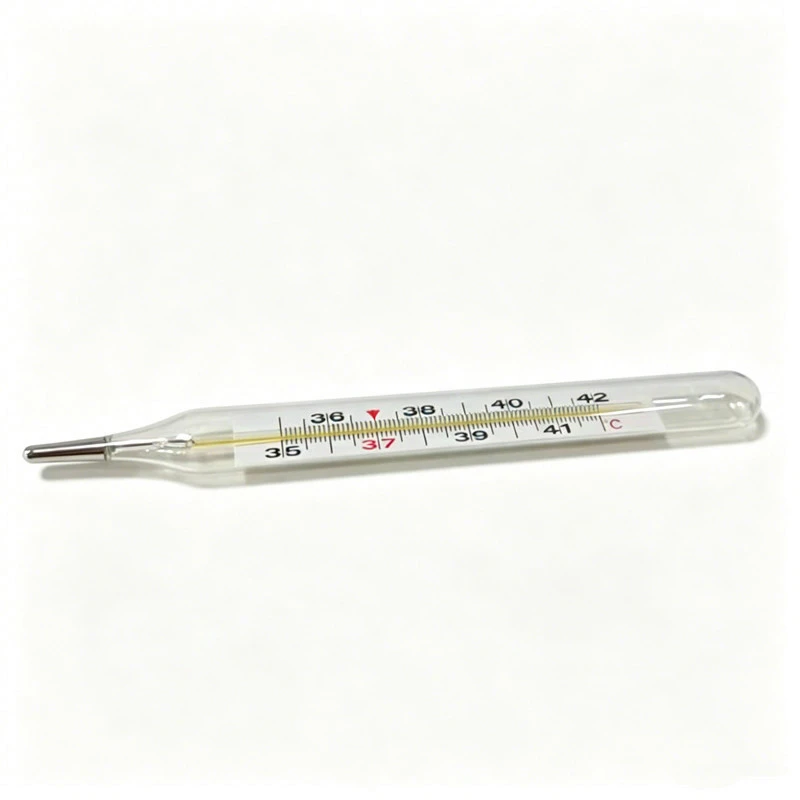
Another big thing: making sure you don’t miss the small subdivisions. Most glass thermometers aren’t marked with whole numbers only. For clinical thermometers, for example, each degree (say, 37°C, which is normal body temp) is split into 10 smaller lines, each representing 0.1°C. That’s why when you read one, you have to look closely. I always tell people to turn the thermometer a little in the light, so the markings stand out—etched lines on glass can be hard to see if the light is dim. For a lab thermometer, the subdivisions might be 0.5°C or even 0.1°C, depending on the accuracy grade. Don’t rush this. It’s easy to glance at the line that’s closest and call it a day, but taking that extra second to line up the meniscus correctly makes all the difference, especially for applications where precision matters—like pharma testing, or baking sourdough, where a 1-degree difference in water temp can affect yeast activity drastically.
Wait, what about resetting the thermometer first? That’s a critical step for clinical and fever thermometers, which are designed to keep the liquid column from falling back on its own after use. Those have a narrow constriction in the stem, just above the bulb. When the liquid expands, it pushes through the constriction, and when it cools, the liquid breaks at the constriction, leaving the top part of the column at the temperature it reached. To reset it, you have to flick it downward sharply, like you’re swinging a bat, to force the liquid back down into the bulb. If you skip this step, you’re not measuring the current temperature—you’re measuring the last temperature it recorded. That’s another super common mistake. A few years back, a parent called our team panicking because their kid’s thermometer was showing 102°F an hour after they’d taken their temp, and it was actually normal. They hadn’t reset it after the first reading, so the liquid was still held high. I walked them through the flick, and it went right down to room temp. For other thermometers, like outdoor weather thermometers or basic kitchen thermometers, they don’t have that constriction—so they’ll read the ambient temperature automatically, no reset needed. But always check for that small constriction above the bulb: if it’s there, reset before use; if not, no reset.
Now, let’s talk about what to do if your liquid column is stuck. This happens more often than you’d think, especially with mercury thermometers that have been dropped, or alcohol thermometers left in extreme temperatures. If the column breaks, with a little bubble of liquid floating in the middle, that’s usually fixable. For mercury, you have to be careful, because it’s toxic, so I always recommend contacting a professional if it breaks inside a clinical thermometer. For alcohol, it’s safer, and you can try gently tapping the end of the stem on a soft surface, like a table covered with a towel, to push the bubbles back together. Or, for lower temperatures, you can hold the bulb in your hand to warm the liquid enough to make it climb a little, and that usually pulls the bubbles back into the main column. If it still won’t straighten out, the thermometer is probably damaged, and it’s time to replace it. That’s why we always recommend handling glass thermometers with care—they’re precision tools, not toys, and a small drop can throw the calibration off entirely. Which brings up a good point: calibration. Glass thermometers don’t self-calibrate like digital ones. Period. Every few years, or if you drop it, submerge it in boiling water, or leave it in extreme cold, you should check its accuracy against a known reference. A simple test for boiling water: at sea level, pure water boils at exactly 100°C (212°F). If you submerge the bulb of your thermometer (making sure the water is moving, not just sitting, because still water can be superheated) and the liquid doesn’t hit that mark, it’s off. For cold water, it should read 0°C (32°F) in an ice bath made of pure water and crushed ice, no added salt (salt lowers the freezing point, so that will give you a wrong number). If it fails that test, it’s time to retire it. That’s a good rule for any glass thermometer, whether it’s a $5 consumer model or a $50 lab grade one—accuracy fades over time, so regular checks are a must.
I know a lot of people reading this will say “why not just use a digital thermometer?” and that’s a fair question. Digital ones are convenient, no doubt—beep at you when they’re done, easy to read, no glass to break. But glass thermometers have advantages that make them irreplaceable for many users. They don’t need batteries, so they work when the power goes out. They’re more accurate in extreme temperatures, like measuring a deep fryer’s oil temp or a freezer that’s -20°C, where digital sensors can drift. They’re also more affordable for bulk orders, which is why restaurants, breweries, and labs still rely on them. But none of those advantages matter if you don’t read them right. I’ve seen customers get frustrated because they bought glass thermometers, then sent them back saying they were “unreliable” when it turned out they just didn’t know how to read them. The tips I’ve shared here—matching the thermometer to the job, prepping by letting it acclimate, holding at eye level, reading the bottom of the meniscus, resetting if needed, and calibrating regularly—fixes 99% of those issues.
If you’re in the market for glass thermometers for your business, whether it’s a small café needing meat thermometers, a lab needing precision models, or a home cook looking for a reliable clinical thermometer, our team is here to help. We don’t just sell thermometers—we’ve been supporting users with these tools for years, so we know the ins and outs of how to use them correctly, and we’re happy to walk you through any questions you have. We offer a range of grades, from consumer-friendly models for home use to high-accuracy lab grade ones, all calibrated to meet industry standards. If you’re looking to place a bulk order, or just have questions about which thermometer is right for your needs and how to read it, reach out to our sales team to discuss your requirements. We can help you pick the right tools for the job, and make sure you have all the resources you need to use them accurately.
At the end of the day, reading a glass thermometer isn’t rocket science, but it does require paying attention to small details. It’s easy to rush, to hold it wrong, to read the wrong part of the meniscus, but taking those extra seconds will give you an accurate number every time. I’ve used glass thermometers for everything from checking the sugar temperature for toffee to calibrating lab equipment, and they’ve never let me down as long as I follow these rules. If you’re ready to invest in reliable glass thermometers, or you have questions about our products, don’t hesitate to connect with our team to discuss your procurement needs.
Nebulizer Accessories References
- National Institute of Standards and Technology. (2020). Guide to the Use of Glass Thermometers in Calibration and Testing. NIST Handbook 150.
- FDA. (2022). Class II Special Controls Guidance Document: Clinical Thermometers. U.S. Food and Drug Administration.
- American Society for Testing and Materials. (2019). Standard Test Method for Temperature Measurement Using Liquid-in-Glass Thermometers. ASTM E77-19.
- Food and Drug Administration. (2021). Food Service Thermometer Use and Best Practices. FDA Food Code Annex 4.
- International Organization for Standardization. (2018). Liquid-in-Glass Thermometers for General Laboratory Use. ISO 817:2018.
Yiwu Trump Medical Products Co., Ltd.
As one of the most professional thermometers manufacturers and suppliers in China, we’re featured by quality products and good service. Please rest assured to wholesale advanced thermometers made in China here from our factory. We also accept customized orders.
Address: Room 428-429, 4th Floor of Comprehensive Building of Hetianxia E-commerce Park, No.16 Pinghu Road, Jiangdong Street, Yiwu City, 322000 Zhejiang Province, China
E-mail: sales01@trumpmedi.com
WebSite: https://www.trumpmedisupply.com/
